Ultimate Guide: Setting Up Django with Postgres, NGINX, and Gunicorn on Ubuntu 22.04

This comprehensive tutorial will walk you through setting up a Django project with Postgres, NGINX, and Gunicorn on Ubuntu 22.04. From installing the necessary software packages and dependencies to configuring the server and deploying your project, this guide will cover every step in detail. Whether you’re new to web development or an experienced developer looking to streamline your server configuration process, this tutorial is a must-read. With clear, concise instructions and helpful tips, you’ll be up and running quickly.
This comprehensive guide will take you step-by-step through setting up your environment, from installing Postgres and NGINX to configuring Gunicorn. We’ll also cover troubleshooting tips and best practices for keeping your setup secure and optimized. Plus, I’ll provide some useful resources for further learning.
Ready to get started? Let’s dive in!
Prerequisites
Before setting up Django with Postgres, NGINX, and Gunicorn on Ubuntu 22.04, there are a few prerequisites. This guide will assume you already have an Ubuntu 22.04 server set up. You’ll also need a user with sudo privileges and an understanding of how to use the command line.
The following packages need to be installed: Python 3, pip3, NGINX, PostgreSQL, and Gunicorn. Python 3 is Django’s programming language; pip3 is a package manager for Python applications; NGINX is a web server and reverses proxy software; PostgreSQL is an open-source object-relational database system; and Gunicorn is the application server used in production environments when running Django apps.
And I’ll be using a droplet server from Digital Ocean with Ubuntu 22.04 installed.
It’s also important to understand how to properly configure each one of these packages so they can work together in harmony. To start off let’s begin by installing all of the necessary dependencies for our setup.
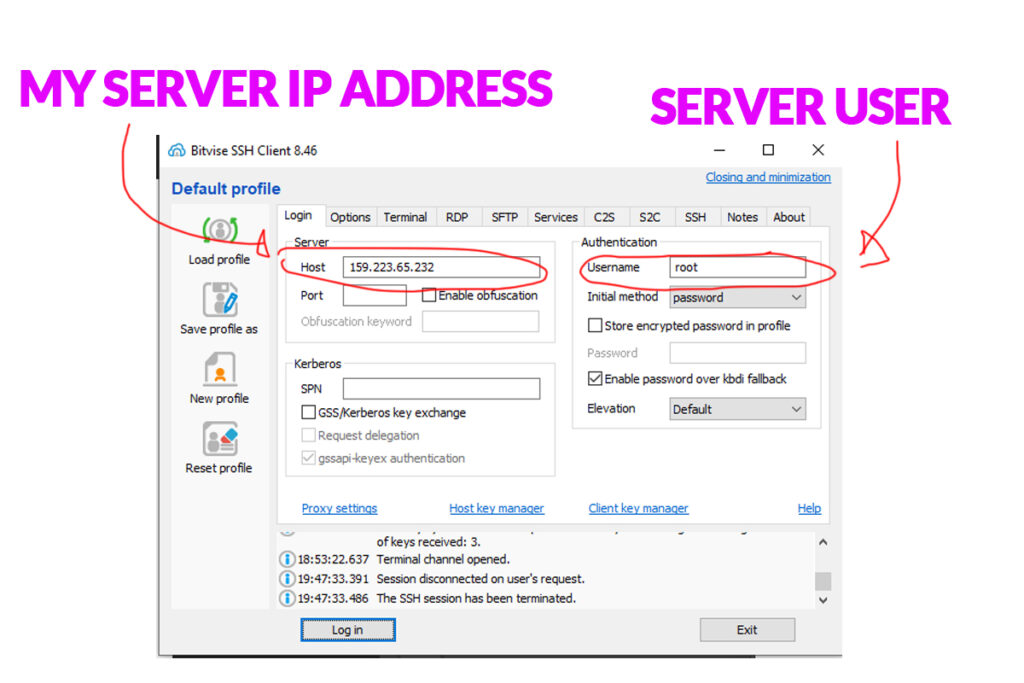
Login to your Digital Ocean Droplet server or any VPS server with Ubuntu 22.04 Operating System
You’ll need your Droplet IP address or your server IP address.
I use “root” as a user for tutorial purposes, but if it’s on your production server, you should check the security and not use “root” user to access the server.
The screenshot below shows how I log in to the server using Bitvise.
I have another article where I used bitvise and have detailed screenshots of how I used it. This article, “How to Install Linux, NGINX, MariaDB, & PHP (LEMP Stack) on Ubuntu 22.04 Server,” shows how I used bitvise.
Ubuntu Server Update System
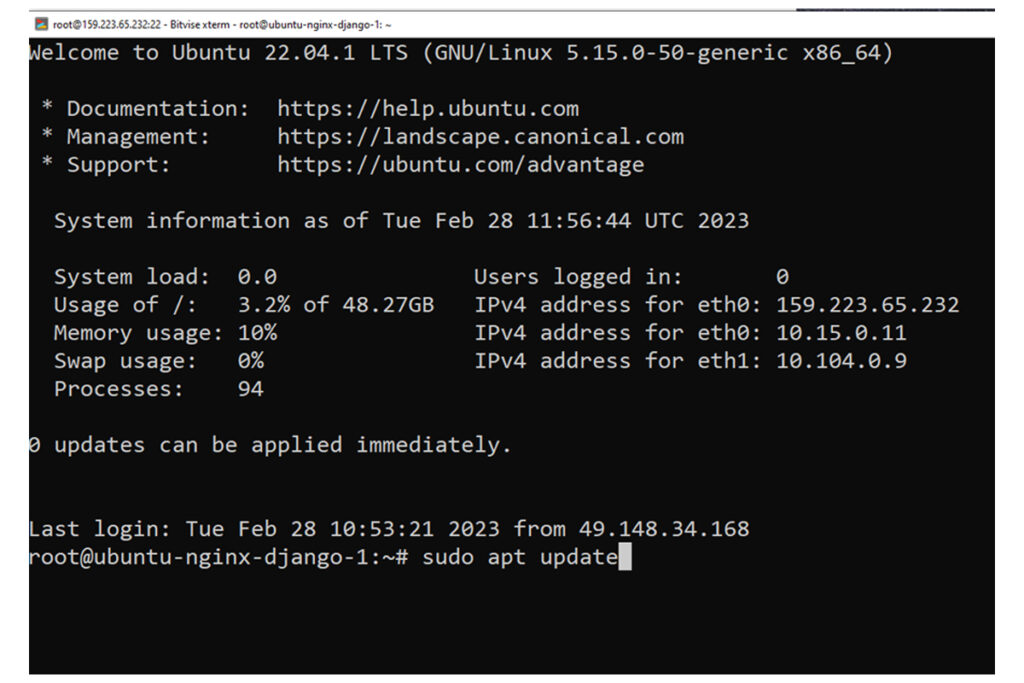
Now that the prerequisites have been resolved, we can set everything up. The first step is to ensure our Ubuntu server is up-to-date by running a system update. This can be done with the following command:
sudo apt-get updateThis will ensure that all packages installed from the APT repository are at their latest versions and that any security patches have been applied. After the update, it’s time to install the necessary packages for our Django setup.
Install Python 3, PostgreSQL, NGINX, curl, and pip3
Python 3 is a popular programming language for web development, scientific computing, and data analysis. PostgreSQL is a powerful open-source relational database management system commonly used for data storage in web applications. NGINX is a high-performance web server and reverse proxy that is often used to serve static content and proxy requests to application servers. a curl is a command-line tool that transfers data between servers, while pip3 is a package manager for Python that is used to install and manage Python packages and dependencies. These technologies provide a robust and powerful environment for web application development.
I’ll begin by installing Python 3, PostgreSQL, NGINX, curl, and pip3, which can be done with the following command:
sudo apt install python3-pip python3-dev libpq-dev postgresql postgresql-contrib nginx curlIn PostgreSQL create A Database And User
Now that PostgreSQL is installed, it’s time to create a database and user for our Django project. To do this, we’ll need to access the PostgreSQL command line. We can do this by running the following command:
sudo -u postgres psqlThis will open up the PostgreSQL prompt. From here, we can create a database and user for our project. First, we’ll create a new database with the following command:
CREATE DATABASE djangdatabase;This will create a new database called ‘djangdatabase’. Now that we have created a database, we can create a user to access it. We’ll use the following command to do so:
CREATE USER djangodbuser WITH PASSWORD 'password';Alter the postgres role
ALTER ROLE djangodbuser SET client_encoding TO 'utf8';
ALTER ROLE djangodbuser SET default_transaction_isolation TO 'read committed';
ALTER ROLE djangodbuser SET timezone TO 'UTC';
This will create a new user called ‘myprojectuser’ with password ‘password’. Now, all that’s left is to grant this user access to our newly created database:
GRANT ALL PRIVILEGES ON DATABASE djangdatabase TO djangodbuser;Quit postgres type \q
\q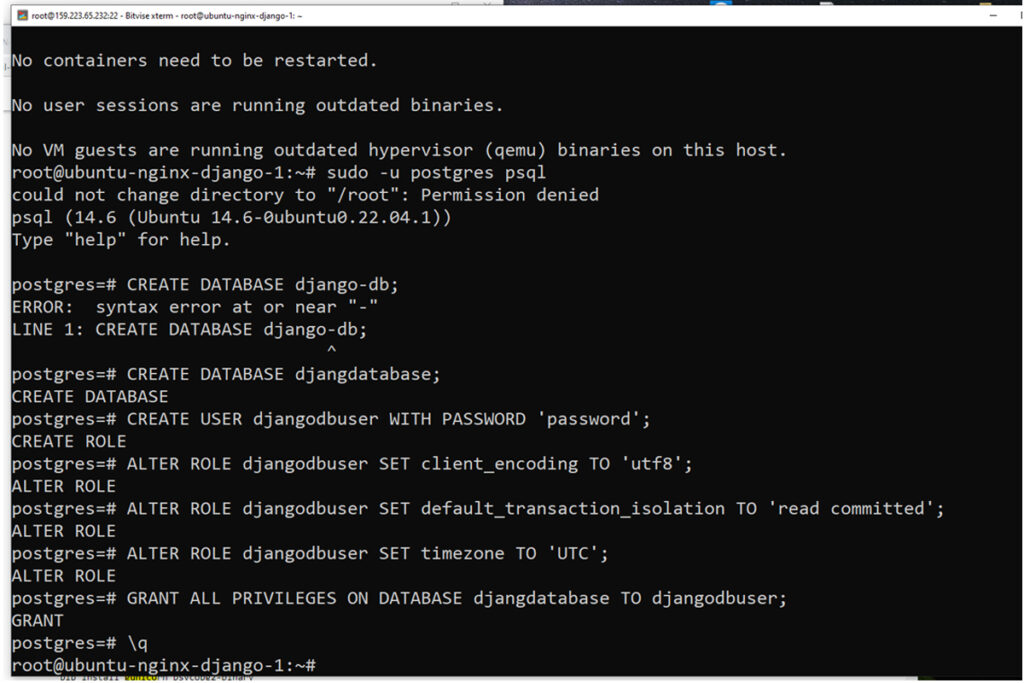
Upgrade pip and install virtualenv
Now that our database and user are set up, it’s time to move on to the next step: installing pip, and virtualenv. This will allow us to create a virtual environment for our project, which will help keep our project’s dependencies separate from other projects.
We can upgrade pip and install virtualenv by running the following command in the terminal:
sudo -H pip3 install --upgrade pip && sudo -H pip3 install virtualenvIf everything has been installed correctly, this should print out the current version of Python and pip you have installed on your system. With that done, let’s move on to install Gunicorn.
python3 --version
pip --version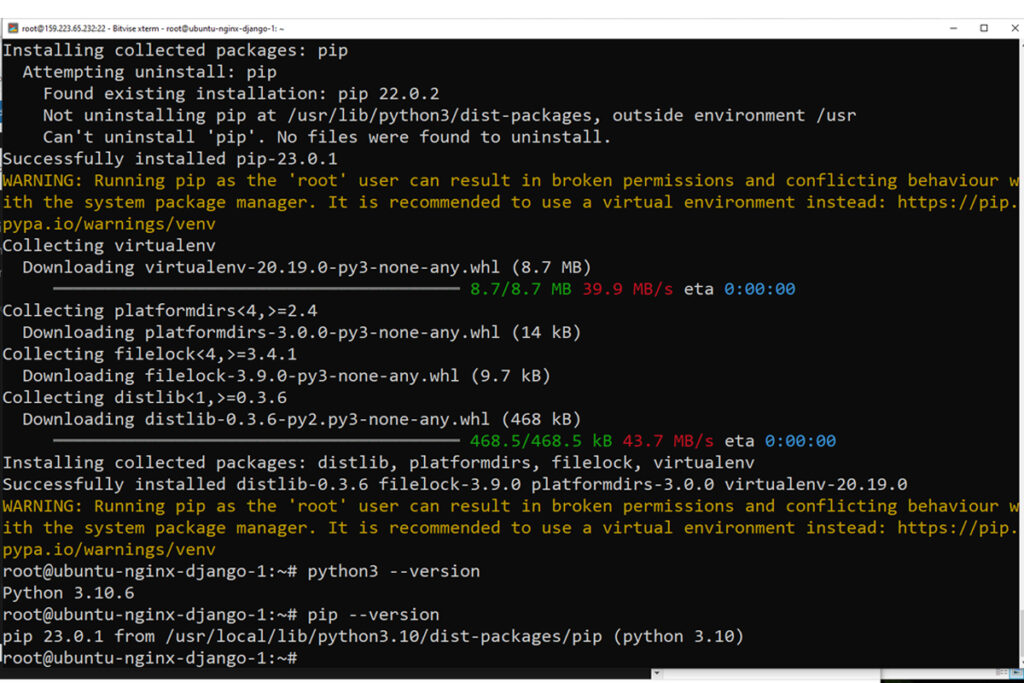
Create a new project directory
Create a new directory for our project. This can be done using the ‘mkdir’ command in the terminal:
mkdir /var/www/django-projectOnce this is done, we can move into the newly created directory with the ‘cd’ command:
cd /var/www/django-projectCreate a new virtualenv
Virtualenv is a tool that allows you to create isolated Python environments. This means that you can install packages and dependencies for a specific project without affecting the system Python installation or any other projects on the same system. Virtualenv creates a self-contained directory with its Python interpreter, libraries, and scripts. You can activate and deactivate virtual environments depending on which project you are working on. This can help you avoid conflicts and ensure that your projects have access to the specific versions of packages and dependencies that they require. Virtualenv is a widely used tool in the Python community, particularly for web development projects.
We’ll use the following command to do so:
virtualenv .venv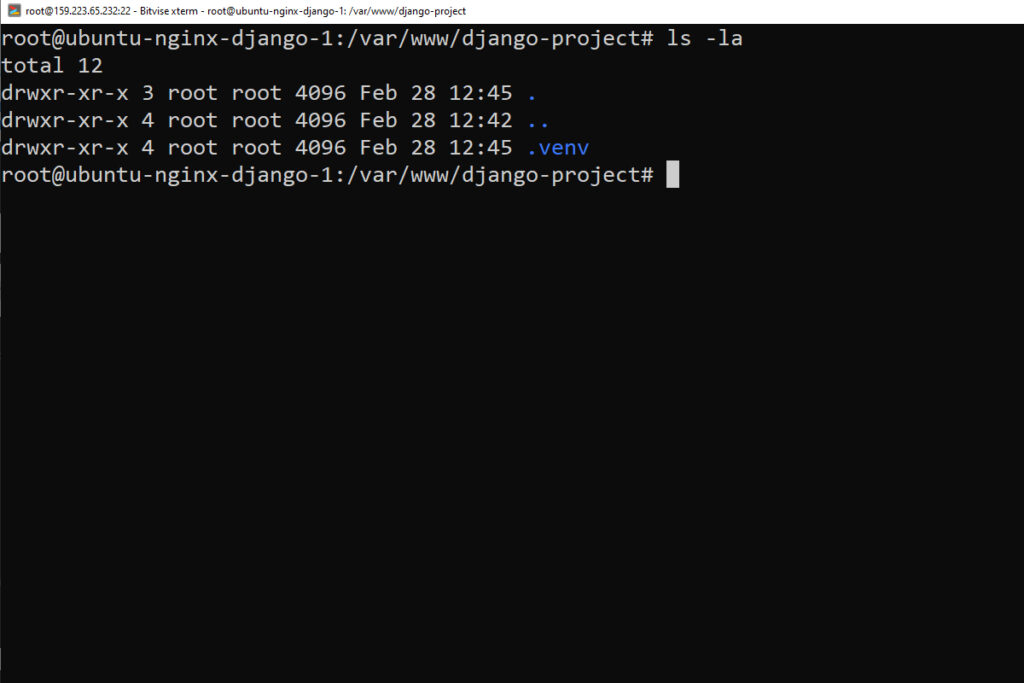
Activate your virtualenv
Activating a virtualenv allows you to use the Python interpreter and packages installed within that environment rather than the system-wide installation. This ensures that the correct versions of packages and dependencies are used for a specific project and helps to avoid conflicts with other projects or the system Python installation. In short, activating a virtualenv is necessary to ensure your Python project runs with the expected environment and dependencies.
We’ll use the following command to do so:
source .venv/bin/activateAfter this has finished, we’ll be ready to set up Gunicorn.
Install Gunicorn and psycopg2-binary
Gunicorn is a Python WSGI HTTP server used to serve our Django application in production. It allows us to handle multiple requests simultaneously and efficiently manage our server’s resources. To install Gunicorn, we’ll use the following command:
pip install gunicornPsycopg2-binary is a Python library used to connect to PostgreSQL databases from Python applications. It provides a fast and efficient interface for working with PostgreSQL and supports a wide range of PostgreSQL features and data types. To install Psycopg2-binary , we’ll use the following command:
pip install psycopg2-binaryInstall Django
Once your virtual environment is up and running, you can use pip to install Django.
We’ll use the following command to do so:
pip install djangoYou should now have everything you need to create a Django project.
Creating and Configuring a New Django Project
Because you already have a project directory, you will instruct Django to install the files there. It will, as is typical, create a second-level directory containing the real code and set a management script in this directory. The crucial point here is that you specifically define the directory rather than expecting Django to make decisions based on our current directory:
Type this command to create a django project
django-admin startproject djangoproject .~/django-project/manage.py: A Django project management script.
~/django-project/djangoproject/: The Django project package.
This should contain the __init__.py,
settings.py,
urls.py, asgi.py, and wsgi.py files.
~/django-project/.venv/: The virtual environment directory you created earlier.Adjusting the Project Settings
/var/www/django-project/djangoproject/settings.pyDjango ALLOWED_HOSTS settings
ALLOWED_HOSTS is a security feature in the Django web framework that specifies a list of valid domain names or IP addresses allowed to access the Django application.
When a request is made to a Django application, the ALLOWED_HOSTS setting checks the request’s Host header against the list of allowed hosts. If the hostname or IP address is not on the list, Django raises a “Bad Request (400)” error to prevent unauthorized access to the application.
The ALLOWED_HOSTS directive is used to specify the list of allowed hosts in the Django settings file, usually located in the settings.py module. This directive’s value is a list of strings, each containing a valid hostname or IP address, separated by commas.
For example, to allow requests only from the domain “example.com” and its subdomains, the ALLOWED_HOSTS setting can be set as follows:
ALLOWED_HOSTS = ['example.com', '.example.com']Therefore, for this tutorial, I will use “*”; however, on the production website, just the domain should be entered as the value.
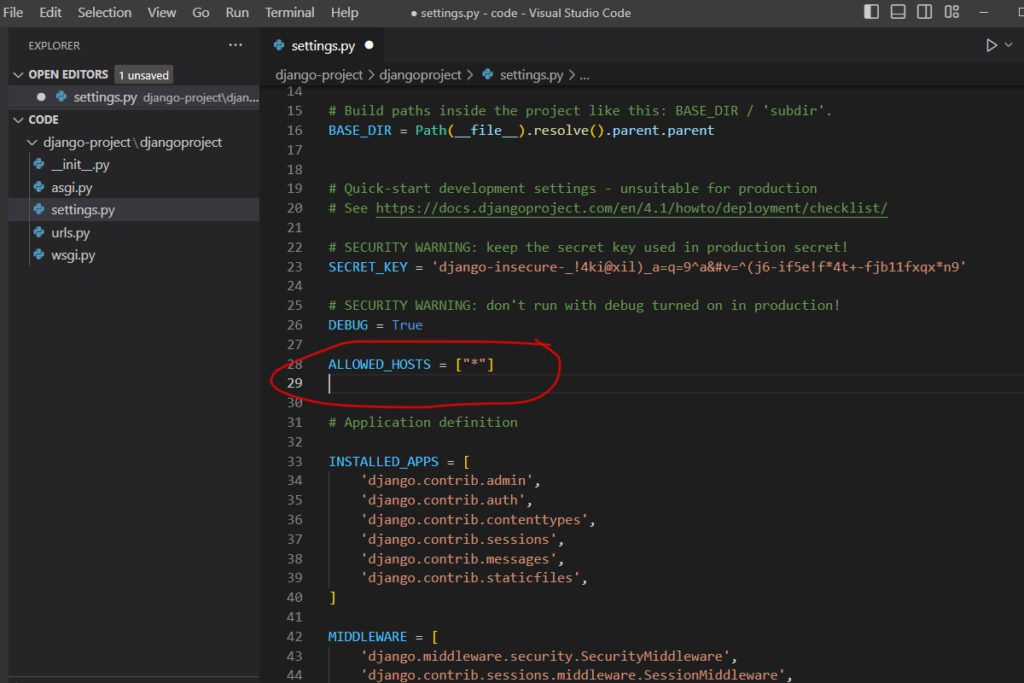
Modify the parameters to reflect the PostgreSQL database information. Django is advised to utilize the psycopg2 adapter, which you installed using pip. You must specify the database name, username, and user password and that the database is located on the localhost. You can specify an empty string for the PORT setting:
# Database
# https://docs.djangoproject.com/en/4.1/ref/settings/#databases
DATABASES = {
    'default': {
        'ENGINE': 'django.db.backends.postgresql_psycopg2',
        'NAME': 'djangdatabase',
        'USER': 'djangodbuser',
        'PASSWORD': 'password',
        'HOST': 'localhost',
        'PORT': '',
    }
}
To check the current directory, type this command
pwdIn current directory will show this
(.venv) root@ubuntu-nginx-django-1:/var/www/django-project# pwdTo check the files inside this directory, type this command
ls -laIt will display the files like in the image below
(.venv) root@ubuntu-nginx-django-1:/var/www/django-project# ls -la
total 20
drwxr-xr-x 4 root root 4096 Feb 28 13:06 .
drwxr-xr-x 4 root root 4096 Feb 28 12:42 ..
drwxr-xr-x 4 root root 4096 Feb 28 12:45 .venv
drwxr-xr-x 3 root root 4096 Feb 28 13:29 djangoproject
-rwxr-xr-x 1 root root  669 Feb 28 13:06 manage.py
Run migrations for the first time by typing this command
python manage.py migrateYou will see in your terminal like the image below
(.venv) root@ubuntu-nginx-django-1:/var/www/django-project# python manage.py migrate
Operations to perform:
  Apply all migrations: admin, auth, contenttypes, sessions
Running migrations:
  Applying contenttypes.0001_initial... OK
  Applying auth.0001_initial... OK
  Applying admin.0001_initial... OK
  Applying admin.0002_logentry_remove_auto_add... OK
  Applying admin.0003_logentry_add_action_flag_choices... OK
  Applying contenttypes.0002_remove_content_type_name... OK
  Applying auth.0002_alter_permission_name_max_length... OK
  Applying auth.0003_alter_user_email_max_length... OK
  Applying auth.0004_alter_user_username_opts... OK
  Applying auth.0005_alter_user_last_login_null... OK
  Applying auth.0006_require_contenttypes_0002... OK
  Applying auth.0007_alter_validators_add_error_messages... OK
  Applying auth.0008_alter_user_username_max_length... OK
  Applying auth.0009_alter_user_last_name_max_length... OK
  Applying auth.0010_alter_group_name_max_length... OK
  Applying auth.0011_update_proxy_permissions... OK
  Applying auth.0012_alter_user_first_name_max_length... OK
  Applying sessions.0001_initial... OK
Now allow port 8000 to test django website using this port
sudo ufw allow 8000Finally, you can test out your project by starting up the Django development server with this command:
python manage.py runserver 0.0.0.0:8000In your web browser, visit your server’s domain name or IP address followed by :8000:
http://server_IP_or_domain:8000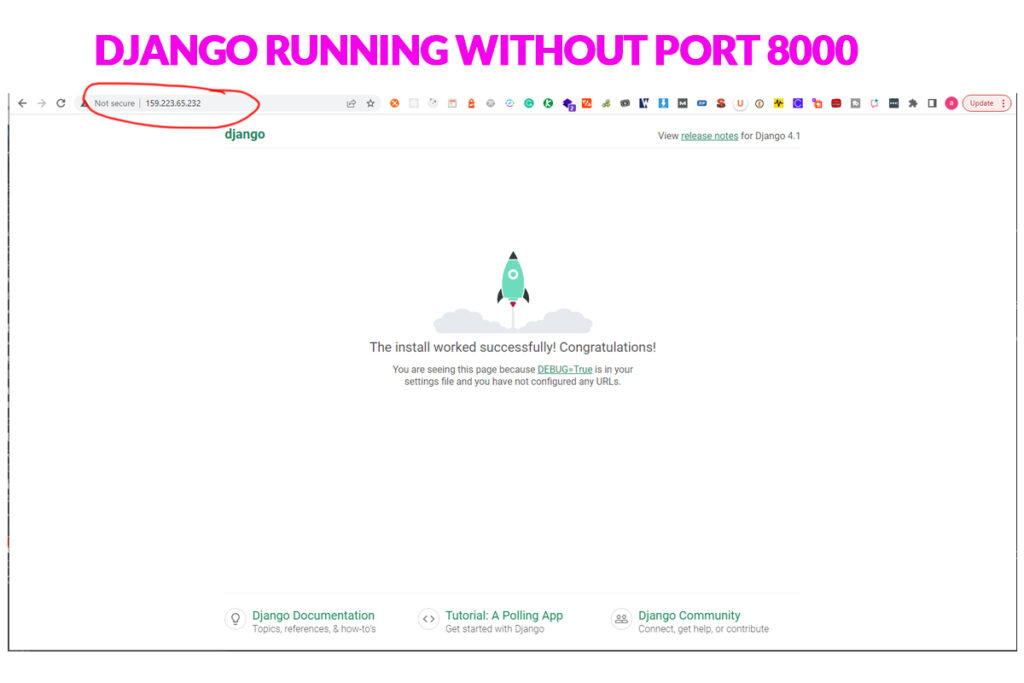
Before using the Gunicorn we need to deactivate the virtualenv. To check in your terminal you have looked like in the image below.
(.venv) root@ubuntu-nginx-django-1:/var/www/django-project#Type deactivate, and your terminal will look like in the image below. The (.venv) will disappear.
(.venv) root@ubuntu-nginx-django-1:/var/www/django-project# deactivate
root@ubuntu-nginx-django-1:/var/www/django-project#
Create a Gunicorn socket file
You’ve shown that Gunicorn can communicate with our Django application, but you need now to create a more consistent system of starting and stopping the application server. You will create systemd service and socket files to accomplish this.
At boot, the Gunicorn socket will be created and will listen for connections. After a connection is made, systemd will launch the Gunicorn process to handle the connection.
Begin by establishing and opening a systemd socket file with sudo capabilities for Gunicorn:
sudo nano /etc/systemd/system/gunicorn.socketInside, you will create a [Unit] section to describe the socket, a [Socket] section to define the socket location, and an [Install] section to make sure the socket is created at the right time:
[Unit]
Description=gunicorn socket
[Socket]
ListenStream=/run/gunicorn.sock
[Install]
WantedBy=sockets.target
Create a systemd file for gunicorn with sudo privileges
sudo nano /etc/systemd/system/gunicorn.serviceAnd add this to it
[Unit]
Description=gunicorn daemon
Requires=gunicorn.socket
After=network.target
[Service]
User=root
Group=www-data
WorkingDirectory=/var/www/django-project
ExecStart=/var/www/django-project/.venv/bin/gunicorn \
        --access-logfile - \
        --workers 3 \
        --bind unix:/run/gunicorn.sock \
        django-project.wsgi:application
[Install]
WantedBy=multi-user.target
Start and enable the gunicorn
sudo systemctl start gunicorn.socket && sudo systemctl enable gunicorn.socketCheck the status of the process.
sudo systemctl status gunicorn.socketThe response should look like the one below.
root@ubuntu-nginx-django-1:/var/www/django-project# sudo systemctl status gunicorn.socket
● gunicorn.socket - gunicorn socket
     Loaded: loaded (/etc/systemd/system/gunicorn.socket; enabled; vendor preset: enabled)
     Active: active (listening) since Tue 2023-02-28 13:56:11 UTC; 6s ago
   Triggers: ● gunicorn.service
     Listen: /run/gunicorn.sock (Stream)
     CGroup: /system.slice/gunicorn.socket
Check the existence of the new socket file.
file /run/gunicorn.sockThe output looks like below
oot@ubuntu-nginx-django-1:/var/www/django-project# file /run/gunicorn.sock
/run/gunicorn.sock: socket
Check the gunicorn status with
sudo systemctl status gunicornTest the socket activation with a curl command
curl --unix-socket /run/gunicorn.sock localhostAt this point, it doesn’t hurt to restart gunicorn with
sudo systemctl daemon-reload && sudo systemctl restart gunicornConfigure NGINX to Proxy Pass to Gunicorn
Create a new server block in NGINX
Now that Gunicorn is set up, you must configure NGINX to pass traffic to the process.
Start by creating and opening a new server block in NGINX’s sites-available directory:
sudo nano /etc/nginx/sites-available/django-projectInside, open up a new server block. You will start by specifying that this block should listen on the normal port 80 and that it should respond to your server’s domain name or IP address, but in my server block, I used this server_name 159.223.65.232.
Next, you will tell NGINX to ignore any problems finding a favicon. You will also tell it where to find the static assets you collected in your location /static/ {} directory. These files have a standard URI prefix of “/static,” so you can create a location block to match those requests.
Finally, create a location / {} block to match all other requests. Inside this location, you’ll include the standard proxy_params file included with the NGINX installation and then pass the traffic directly to the Gunicorn socket:
server {
    listen      80;
    listen      [::]:80;
    server_name 159.223.65.232;
    charset     UTF-8;
    error_log   /var/www/django-project/nginx-error.log;
    location = /favicon.ico { access_log off; log_not_found off; }
    location /static/ {
        alias /var/www/django-project/static/;

    }
    location /media/ {
        alias /var/www/django-project/media/;
    }
    location / {
        include proxy_params;
        proxy_pass http://unix:/run/gunicorn.sock;
    }
}
Add the server block above by using this command “sudo nano /etc/nginx/sites-available/django-project”
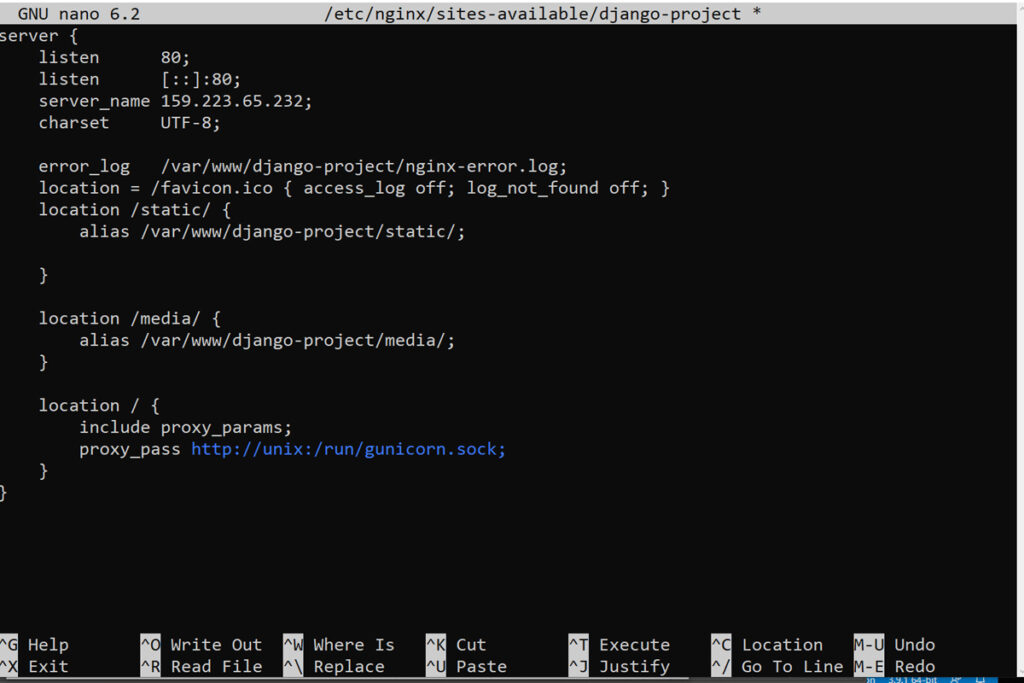
The nano command will appear, and you will enter the server block code above. To save to the new config file, press the keyboard CTR + S and quit the nano command CTR + X.
After you Save and close the file. Now, you can enable the file by linking it to the sites-enabled directory:
sudo ln -s /etc/nginx/sites-available/django-project /etc/nginx/sites-enabledTest your NGINX configuration for syntax errors by typing.
sudo nginx -tIf no errors are reported, go ahead and restart NGINX by typing.
sudo systemctl restart nginxFinally, you need to open your firewall to normal traffic on port 80. Since you no longer need access to the development server, you can also remove the rule to open port 8000.
sudo ufw delete allow 8000sudo ufw allow 'Nginx Full'You should now be able to go to your server’s domain or IP address to view your application.

Frequently Asked Questions
What Is The Difference Between NGINX And Gunicorn?
NGINX and Gunicorn are popular web servers designed to help developers manage websites. They both offer a variety of features, but they have some key differences that should be considered when choosing which one to use.
The first difference between NGINX and Gunicorn is in their architecture. NGINX is known as an asynchronous event-driven server, meaning it can handle multiple requests at once without additional threads or processes. Gunicorn, on the other hand, is a synchronous pre-forking server, meaning it requires an additional thread or process for each new request. This means that NGINX is better suited for handling high traffic volumes than Gunicorn.
Another difference between NGINX and Gunicorn is the type of applications they can run. NGINX is mainly used to serve static content such as HTML pages and images, while Gunicorn can be used to serve more dynamic applications such as Python web frameworks like Django or Flask. Additionally, Nginx supports various scripting languages, such as PHP and Perl, whereas Gunicorn does not.
Both servers can handle large loads in terms of performance and scalability but in different ways. In general, NGINX performs better under high load due to its asynchronous architecture, whereas Gunicorn may be more suited for smaller applications due to its synchronous architecture. Ultimately, it will come down to the needs of your particular application when deciding which server to use.
How Do I Ensure My Django Application Is Secure?
Securing a Django application is a crucial step in any development process. In order to ensure that your applications are safe, there are several steps that should be taken. This article will discuss how to ensure your Django application is secure and provide some tips on how to do so.
One of the most important steps in securing a Django application is ensuring all necessary security updates are applied. This means that any software packages used by your application must be up-to-date with the latest security patches and bug fixes. Additionally, it’s also important to ensure that all passwords used for authentication are strong and unique and that any sensitive data stored in the database is encrypted.
Another key aspect of ensuring your Django application’s security is to have an effective logging system in place. This can help you quickly detect suspicious activity or potential vulnerabilities, allowing you to take action before any damage occurs. Additionally, having an intrusion detection system can help you identify malicious traffic and block it from accessing your system. Finally, deploying a web application firewall can further protect your applications by scanning incoming requests for malicious patterns and blocking them if they meet certain criteria.
Following these best practices when setting up a Django application can help keep it secure and protect yourself against potential threats. Keeping security updates up-to-date, using strong passwords, encrypting sensitive data, implementing logging systems and intrusion detection systems, as well as deploying web application firewalls can all go a long way towards ensuring your applications remain safe from malicious attacks or other threats.
How Do I Set Up An SSL Certificate For My Django Application?
Setting up an SSL certificate for a Django application is essential to ensure security and data privacy. SSL certificates encrypt the server and the client, preventing malicious actors from intercepting any transmitted data. Additionally, installing an SSL certificate shows customers that their information is safe when browsing a website, providing them with reassurance and boosting trust in the site.
To get started, you must first obtain a valid SSL certificate for your domain name. This can be done through Certificate Authorities (CAs), such as Let’s Encrypt or DigiCert. Once you have obtained the certificate, you must configure it with NGINX. When configuring the certificate, ensure it is set up correctly according to your CA’s instructions and is compatible with NGINX.
Once configured, you must configure Gunicorn to work with your SSL certificate. This typically requires adding a few lines of code to your Gunicorn configuration file, so ensure you are familiar with the syntax before attempting this step. Finally, test your setup by visiting your website and ensuring all its pages are served securely over HTTPS. If something isn’t working correctly, revisit each process step to determine what went wrong and rectify it accordingly.
What Are The Benefits Of Using Postgresql For My Django Application?
Using Postgresql for a Django application brings several benefits. It is an open-source database, allowing for more flexibility and customization than other databases. Additionally, it has a robust feature set, including support for multiple schemas, sophisticated indexing, and stored procedures. It also offers excellent scalability, reliability, and security performance, often superior to other relational databases.
These advantages can be especially beneficial when developing a large-scale web application powered by Django. Postgresql is well-suited to support the high demand for such applications since it’s known to be very reliable and efficient in handling large volumes of data. Moreover, its intuitive user interface allows developers to quickly create complex queries and manage data organizationally.
Furthermore, Postgresql is extremely versatile and able to handle different types of data like text, numbers, images, etc., which makes it ideal for any web application built with Django. It also supports a wide range of programming languages, such as Python, JavaScript, GoLang, and more. This allows developers to use whatever language they feel most comfortable with when coding their applications.
Overall, Postgresql is an excellent choice for powering a Django web application due to its robust feature set and versatility. Its scalability and reliability make it ideal for large-scale applications, while its intuitive user interface allows developers to quickly create complex queries and manage data in an organized way. For these reasons alone, it should definitely be considered when building any web application with Django.
How Do I Debug Any Issues That Arise During The Setup Process?
Debugging any issues arising during the setup process can be difficult. It requires technical know-how, patience, and the ability to think outside the box to identify potential problems and find solutions. For those setting up Django with Postgres, NGINX, and Gunicorn on Ubuntu 22.04, debugging any issues is an essential part of the process.
The first step in debugging any issue is to identify what the problem is. This can be done by looking through log files or running certain tests on your system to determine if there are any errors that could be causing issues with the setup process. Once you’ve determined what the problem is, you can then go about finding a solution. This may involve updating your software or configuration settings or even doing some manual troubleshooting steps, such as reinstalling parts of the system that may not be working properly.
Regardless of how much technical knowledge you have, it’s important to remember that debugging any issue requires patience and a thorough approach in order to ensure everything runs smoothly. Taking your time researching potential solutions will ensure that you get your application running without any major headaches. With a bit of effort and research, anyone should be able to debug their setup process without too much difficulty.
Conclusion
In conclusion, setting up Django with Postgres, NGINX, and Gunicorn on Ubuntu 22.04 is straightforward, but some important points must be considered. First and foremost, it’s essential to understand the differences between the components of this setup – NGINX and Gunicorn – to ensure your application is secure. Additionally, an SSL certificate should be set up for extra security measures. Furthermore, using PostgreSQL has several benefits that can improve the performance of your Django application. Finally, if any issues arise during the setup process, it’s important to have a mechanism for debugging them quickly and effectively. With these considerations in mind and time invested in setting up Django with Postgres, NGINX, and Gunicorn on Ubuntu 22.04 properly, you’ll have an efficient and secure application running smoothly in no time!
Finally, if you are still struggling with what I discussed above, don’t hesitate to contact me if you need anything about the webserver/DJANGO/NGINX or extra help with a web developer, and feel free to buy me a cup of coffee if that is fine with you.

